Metainformationen zur Seite
Dies ist eine alte Version des Dokuments!
Tipps und Tricks
Hier finden Sie verschiedene Tipps und Tricks rund um C#, .NET und Visual Studio (Verschieden Versionen).
ContextSwitchDeadlock erkennen und umgehen
Fehlermeldung Visual Studio 2019
| Message |
|---|
| ContextSwitchDeadlock wurde erkannt. Message: Die CLR konnte 60 Sekunden lang keinen Übergang vom COM-Kontext 0x2c32f90 zum COM-Kontext 0x2c331e0 durchführen. Der Thread, der Besitzer des Zielkontexts/-apartments ist, wartet entweder, ohne Meldungen zu verschieben, oder verarbeitet eine äußerst lang dauernde Operation, ohne Windows-Meldungen zu verschieben. Eine solche Situation beeinträchtigt in der Regel die Leistung und kann sogar dazu führen, dass die Anwendung nicht mehr reagiert oder die Speicherauslastung immer weiter zunimmt. Zur Vermeidung dieses Problems sollten alle STA-Threads (Singlethread-Apartment) primitive Typen verwenden, die beim Warten Meldungen verschieben (z.B. CoWaitForMultipleHandles), und bei lange dauernden Operationen generell Meldungen verschieben. |
Diese tritt beim abfragen von Fenstertitel der Anwendungen auf, der Code dazu:
Der code wird in Visual Studio 2019 im Debug Modus ausgeführt. Wie kann man dieses „hängen bleiben“ erkennen und abbrechen, gibt es da überhaupt eine Möglichkeit?
Erklärung
Wenn man im Debug Modus anhält, dann werden auch keine Windows-Nachrichten mehr verarbeitet. Das heißt, die COM-Komponente verarbeitet eine Windows-Nachricht, die verursacht, dass in deinen Code gesprungen wird. Sollte dann binnen 60 Sekunden keine Rückantwort kommen, dann erhälst Du diese Fehlermeldung, weil die COM Komponente keine weiteren Nachrichten verarbeiten kann derweil.
Lösung
Einfach die Exception in den Visual Studio Einstellungen abschalten.
In Visual Studio 2019 zusätzliche Debug Informationen auschalten
Zusätzliche Debug Informationen
 Die Standardeinstellungen in Visual Studio 2019 zeigt oben auf jedem WPF Fenster zusätziche Tool zum debugen des Programm an.
Nachteil ist, dass damit auch darunterliegende Komponenten verdeckt werden.
Mit folgenden Schritten lässt sich das auch ausschalten:
English Version : Tools → Options → Debugging → General → Enable UI Debugging Tools for XAML Deutsche Version : Extras → Optionen → Debugging → Allgemein → UI-Debugtool für XAML aktivieren
Setzen oder entfernen Sie einfach das Häckchen.
Window und Screen Mouse Koordinaten ermitteln
Wie wir alle wissen gibt es Methoden die uns die Mausposition relativ zu anderen controls zurückgibt. Doch manchmal möchte wir auch die Mausposition ausserhalb des Fensters wissen. Diese Kurzanleitung soll einen kleinen Tipp sein.
Demo Code
Bei diesem Beispiel wird die Mausposition auf der obersten Titelleiste (WindowTitle) angezeigt. Die Koordination sind innerhalb des Fensters auf die Zeichnungsfläche bezogen und ausserhalb des Fensters werden die Screen Koordinaten angezeigt.
Der Event OnRendering() wird vor dem Zeichnen des WPF Fenster ausgeführt. Dieses Beispiel ist eine verkürzte Abschrift und wurde zur Sicherung kopiert.
WPF, DependencyProperty.Register() or .RegisterAttached
| English | Deutsch |
|---|---|
| I assume you meant DependencyProperty.Register and DependencyProperty.RegisterAttached. DependencyProperty.Register is used to register normal DependencyProperty. You can see those as just regular properties, with the added twist that they can take part in WPF's DataBinding, animations etc. In fact, they are exposed as normal property (with the get and set accessors) on top of the untyped DependencyObject.SetValue / GetValue. You declare those as part of your type. Attached properties on the other hand are different. They are meant as an extensibility system. If you have ever used Extenders in Windows Forms, they are kind of similar. You declare them as part of a type, to be used on another type. They are used a lot for layout-related information. For example, Canvas needs Left/Top coordinates, Grid needs a Row and a Column, DockPanel needs a Dock information etc. It would be a mess if all of this had to be declared on every Control that can be layouted. So they are declared on the corresponding panel, but used on any Control. You can use the same thing to attach any information to a DependencyObject if you need to. It can come in handy to just declare a piece of information that you can set in xaml just to be used later in a style for an existing class for example. So those two kind of DependencyProperty serve a very different purpose. Regular properties (registered through Register() ) are used just like normal properties as part of the interface of your type. Attached properties (registered through RegisterAttached() ) are used as an extensibility point on existing classes. Hope that clarifies it a bit. | Ich nehme an, Sie meinten DependencyProperty.Register und DependencyProperty.RegisterAttached. DependencyProperty.Register wird verwendet, um normale DependencyProperty zu registrieren. Sie können diese als ganz normale Eigenschaften betrachten, mit dem zusätzlichen Vorteil, dass sie an WPFs DataBinding, Animationen usw. teilnehmen können. In der Tat sind sie als normale Eigenschaft (mit den Get- und Set-Accessoren) auf dem untypisierten DependencyObject.SetValue / GetValue ausgesetzt. Sie deklarieren diese als Teil Ihres Typs. Angehängte Eigenschaften hingegen sind anders. Sie sind als ein System zur Erweiterung gedacht. Wenn Sie schon einmal Extender in Windows Forms verwendet haben, sind sie sehr ähnlich. Sie werden als Teil eines Typs deklariert, um in einem anderen Typ verwendet zu werden. Sie werden häufig für layoutbezogene Informationen verwendet. Zum Beispiel braucht Canvas Links/Oben-Koordinaten, Grid braucht eine Row und eine Column, DockPanel braucht eine Dock-Information usw. Es wäre unübersichtlich, wenn all dies für jedes Steuerelement, das für das Layout verwendet werden kann, deklariert werden müsste. Also werden sie auf dem entsprechenden Panel deklariert, aber auf jedem Control verwendet. Sie können dasselbe tun, um beliebige Informationen an ein DependencyObject anzuhängen, wenn Sie es brauchen. Es kann sehr nützlich sein, eine Information zu deklarieren, die man in xaml einstellen kann, um sie später in einem Stil für eine bestehende Klasse zu verwenden, zum Beispiel. Diese beiden Arten von DependencyProperty dienen also einem sehr unterschiedlichen Zweck. Reguläre Eigenschaften (registriert durch Register() ) werden wie normale Eigenschaften als Teil der Schnittstelle Ihres Typs verwendet. Angehängte Eigenschaften (registriert durch RegisterAttached() ) werden als Erweiterungspunkt für bestehende Klassen verwendet. Ich hoffe, das macht es ein wenig klarer. |
How to Test Your Internal Classes in C# (NUnit)
How to test internal classes? (microsoft,) 2019-12-10 by Johnny Graber
One of the most important concepts of object-oriented design is encapsulation. You try to hide all the internal things of a class from the other developers and only offer them a subset of functionality to use. You can achieve this by setting an appropriate access modifier for your methods and classes:
- public: The type or member can be accessed by any other code in the same assembly or another assembly that references it.
- private: The type or member can be accessed only by code in the same class or struct.
- protected: The type or member can be accessed only by code in the same class, or in a class that is derived from that class.
- internal: The type or member can be accessed by any code in the same assembly, but not from another assembly.
- protected internal: The type or member can be accessed by any code in the assembly in which it is declared, or from within a derived class in another assembly. (as in protected OR internal)
- private protected: The type or member can be accessed only within its declaring assembly, by code in the same class or in a type that is derived from that class. (as in private OR protected)
Public and private are the two most used access modifiers. You find them in all the examples, they are straight forward to use and do exactly what you expect. They are a great help to manage access to the methods in your classes and the classes themselves.
If we look at bigger parts of our application, we use code from different assemblies or NuGet packages. Those distribution formats have their own boundaries that you can use to enforce encapsulation. Public and private access modifiers are again a great help. However, over the years I appreciated the internal access modifier more and more.
Benefits of the internal access modifier
There is always that code that you need but has no place to go. It is not a class on its own and it does not fit to any other. At some point you stop searching for the right place and put it into a class called MyHelper. That code can’t be private, then many of your classes need them. And you do not want to make it public, then this code should not be called from outside your assembly.
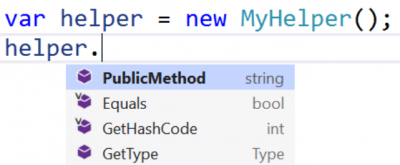
The internal access modifier is exactly made for such use cases. By declaring the class or just a few methods as internal, you can access them from everywhere in your assembly but not from outside. All you need to do is to write internal instead of public or private:
The users of your assembly or NuGet package do not know that this helper method exist. That allows you to freely move that code around to a better location or refactor it until you find a more fitting abstraction. All that without the need to change code outside your assembly – then no one else can call it directly.
How to test internal methods and classes?
That helper code you marked with internal is most often important. Therefore, you should write extensive tests for those classes and methods. But how can you do that when you can’t access that code from outside your assembly?
The .NET Framework offers the InternalsVisibleTo attribute to specify which other assemblies can access the internal methods and classes inside this assembly. All you need to do is to add this attribute to the AssemblyInfo.cs file and pass the name of your test assembly to the constructor:
When you put this attribute to the AssemblyInfo.cs file, then all internal methods can be accessed by code inside the Logic.Tests assembly. To test your internal code this behaviour is exactly what you want. If this is too much, you can add this attribute in a specific class and only allow access to the internal methods of this class.
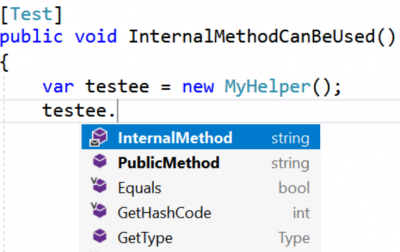
As soon as you recompile your assembly, the code in your test assembly can access your internal methods:
.Net Core
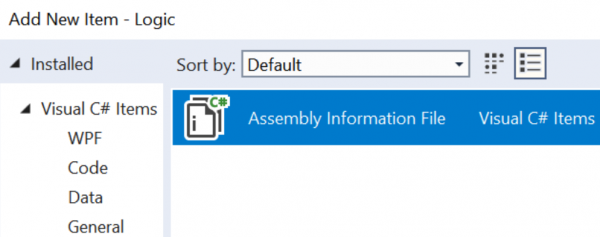
In .Net Core you do not have an AssemblyInfo.cs file. You can add one with the Add New Item dialog and set the attribute there in the same way you would do that in the .Net Full Framework and get exactly the same benefits.
.Net Standard project
As pointed out by Miguel Alho in the comments, you can add an ItemGroup in your *.csproj file to get the same effect. For that, paste this code as the last block before the closing project tag:
Conclusion
Use the internal access modifier the next time you have helper code that you need but no one else should call. This little keyword will help you to hide your mess inside your assembly and still allows you to write tests. With internal you get the best of both worlds without breaking encapsulation.
Working with Checkboxes in the WPF TreeView / Arbeiten mit Kontrollkästchen in der WPF TreeView
Introduction
This article reviews a WPF TreeView whose items contain checkboxes. Each item is bound to a ViewModel object. When a ViewModel object’s check state changes, it applies simple rules to the check state of its parent and child items. This article also shows how to use the attached behavior concept to turn a TreeViewItem into a virtual ToggleButton, which helps make the TreeView’s keyboard interaction simple and intuitive.
This article assumes that the reader is already familiar with data binding and templates, binding a TreeView to a ViewModel, and attached properties.
Background
It is very common to have a TreeView whose items are checkboxes, such as when presenting the user with a hierarchical set of options to select. In some UI platforms, such as WinForms, the standard TreeView control offers built-in support for displaying checkboxes in its items. Since element composition and rich data binding are two core aspects of WPF, the WPF TreeView does not offer intrinsic support for displaying checkboxes. It is very easy to declare a CheckBox control in a TreeView’s ItemTemplate and suddenly every item in the tree contains a CheckBox. Add a simple {Binding} expression to the IsChecked property, and suddenly the check state of those boxes is bound to some property on the underlying data objects. It would be superfluous, at best, for the WPF TreeView to have an API specific to displaying checkboxes in its items.
The Devil is in the Details
This sounds too good to be true, and it is. Making the TreeView “feel right,” from a keyboard navigation perspective, is not quite as simple. The fundamental problem is that as you navigate the tree via arrow keys, a TreeViewItem will first take input focus, and then the CheckBox it contains will take focus upon the next keystroke. Both the TreeViewItem and CheckBox controls are focusable. The result is that you must press an arrow key twice to navigate from item to item in the tree. That is definitely not an acceptable user experience, and there is no simple property that you can set to make it work properly. I have already brought this issue to the attention of a certain key member on the WPF team at Microsoft, so they might address it in a future version of the platform.
Functional Requirements
Before we start to examine how this demo program works, first we will review what it does. Here is a screenshot of the demo application in action:
Now let’s see what the functional requirements are:
- Requirement : Each item in the tree must display a checkbox that displays the text and check state of an underlying data object.
- Requirement : Upon an item being checked or unchecked, all of its child items should be checked or unchecked, respectively.
- Requirement : If an item’s descendants do not all have the same check state, that item’s check state must be ‘indeterminate.’
- Requirement : Navigating from item to item should require only one press of an arrow key.
- Requirement : Pressing the Spacebar or Enter keys should toggle the check state of the selected item.
- Requirement : Clicking on an item’s checkbox should toggle its check state, but not select the item.
- Requirement : Clicking on an item’s display text should select the item, but not toggle its check state.
- Requirement : All items in the tree should be in the expanded state by default.
I suggest you copy those requirements and paste them into your favorite text editor, such as Notepad, because we will reference them throughout the rest of the article by number.
Putting the Smarts in a ViewModel
As explained in my ‘Simplifying the WPF TreeView by Using the ViewModel Pattern’ article, the TreeView was practically designed to be used in conjunction with a ViewModel. This article takes that idea further, and shows how we can use a ViewModel to encapsulate application-specific logic related to the check state of items in the tree. In this article, we will examine my FooViewModel class, which the following interface describes:
The most interesting aspect of this ViewModel class is the logic behind the IsChecked property. This logic satisfies Requirements 2 and 3, seen previously. The FooViewModel’s IsChecked logic is below:
Einführung
Dieser Artikel beschreibt eine WPF TreeView, deren Elemente Kontrollkästchen enthalten. Jedes Element ist an ein ViewModel Objekt gebunden. Wenn sich der Prüfstatus eines ViewModel-Objekts ändert, wendet es einfache Regeln auf den Prüfstatus seiner übergeordneten und untergeordneten Elemente an. Dieser Artikel zeigt auch, wie man das angehängte Verhaltenskonzept verwenden kann, um ein TreeViewItem in einen virtuellen ToggleButton zu verwandeln, der hilft, die Tastaturinteraktion des TreeViews einfach und intuitiv zu gestalten.
Dieser Artikel geht davon aus, dass der Leser bereits mit Datenbindung und Templates, der Bindung eines TreeViews an ein ViewModel und angehängten Eigenschaften vertraut ist.
Hintergrund
Es ist sehr üblich, einen TreeView zu haben, dessen Elemente Kontrollkästchen sind, z.B. wenn dem Benutzer ein hierarchischer Satz von Optionen zur Auswahl präsentiert wird. In einigen UI-Plattformen, wie z.B. WinForms, bietet das Standard-TreeView-Steuerelement integrierte Unterstützung für die Anzeige von Kontrollkästchen in seinen Elementen. Da Elementkomposition und reichhaltige Datenbindung zwei Kernaspekte von WPF sind, bietet das WPF TreeView keine integrierte Unterstützung für die Anzeige von Kontrollkästchen. Es ist sehr einfach, ein CheckBox-Steuerelement im ItemTemplate eines TreeViews zu deklarieren und plötzlich enthält jedes Element im Baum eine CheckBox. Fügen Sie der IsChecked-Eigenschaft einen einfachen {Binding}-Ausdruck hinzu, und plötzlich ist der Prüfstatus dieser Boxen an eine Eigenschaft der zugrunde liegenden Datenobjekte gebunden. Es wäre bestenfalls überflüssig, dass die WPF TreeView eine API speziell für die Anzeige von Checkboxen in ihren Elementen hat.
Der Teufel steckt im Detail
Das klingt zu schön, um wahr zu sein, und das ist es auch. Den TreeView aus der Perspektive der Tastaturnavigation „richtig“ zu machen, ist nicht ganz so einfach. Das grundsätzliche Problem ist, dass ein TreeViewItem beim Navigieren durch den Baum mit den Pfeiltasten zuerst den Eingabefokus erhält und dann die CheckBox, die es enthält, beim nächsten Tastendruck den Fokus erhält. Sowohl das TreeViewItem- als auch das CheckBox-Steuerelement sind fokussierbar. Das Ergebnis ist, dass Sie eine Pfeiltaste zweimal drücken müssen, um im Baum von einem Element zum anderen zu navigieren. Das ist definitiv keine akzeptable Benutzererfahrung, und es gibt keine einfache Eigenschaft, die Sie einstellen können, damit es richtig funktioniert. Ich habe bereits ein bestimmtes Mitglied des WPF-Teams bei Microsoft auf dieses Problem aufmerksam gemacht, damit es in einer zukünftigen Version der Plattform behoben werden kann.
Funktionale Anforderungen
Bevor wir untersuchen, wie dieses Demoprogramm funktioniert, sollten wir uns zunächst ansehen, was es tut. Hier ist ein Screenshot der Demoanwendung in Aktion:
Schauen wir uns nun die funktionalen Anforderungen an:
- Anforderung : Jedes Element in der Baumstruktur muss ein Kontrollkästchen enthalten, das den Text und den Kontrollstatus eines zugrunde liegenden Datenobjekts anzeigt.
- Anforderung : Wenn ein Element angekreuzt oder nicht angekreuzt wird, sollten alle seine untergeordneten Elemente angekreuzt bzw. nicht angekreuzt werden.
- Anforderung : Wenn die Nachkommen eines Eintrags nicht alle den gleichen Prüfstatus haben, muss der Prüfstatus dieses Eintrags „unbestimmt“ sein.
- Anforderung : Das Navigieren von Element zu Element sollte nur einen einzigen Druck auf eine Pfeiltaste erfordern.
- Anforderung : Das Drücken der Leertaste oder der Eingabetaste sollte den Prüfstatus des ausgewählten Eintrags umschalten.
- Anforderung : Ein Klick auf das Kontrollkästchen eines Eintrags soll den Kontrollstatus umschalten, aber den Eintrag nicht auswählen.
- Anforderung : Das Anklicken des Anzeigetextes eines Eintrags soll den Eintrag auswählen, aber nicht seinen Markierungsstatus umschalten.
- Anforderung : Alle Elemente in der Baumstruktur sollten sich standardmäßig im erweiterten Zustand befinden.
Ich schlage vor, Sie kopieren diese Anforderungen und fügen sie in Ihren bevorzugten Texteditor ein, z. B. in Notepad, da wir sie im weiteren Verlauf des Artikels nummerisch referenzieren werden.
Die Intelligenz in ein ViewModel packen
Wie in meinem Artikel 'Simplifying the WPF TreeView by Using the ViewModel Pattern' (Vereinfachung der WPF-TreeView durch Verwendung des ViewModel-Musters) erläutert, wurde die TreeView praktisch dafür entwickelt, in Verbindung mit einem ViewModel verwendet zu werden. Dieser Artikel führt diese Idee weiter und zeigt, wie wir ein ViewModel verwenden können, um anwendungsspezifische Logik in Bezug auf den Prüfstatus von Elementen im Baum zu kapseln. In diesem Artikel werden wir meine FooViewModel-Klasse untersuchen, die durch die folgende Schnittstelle beschrieben wird:
d
d
d


